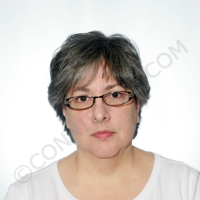
PASSPORT PHOTOS ARE AN ESSENTIAL COMPONENT OF SECURING YOUR PASSPORT. I FIRST POSTED THIS ARTICLE IN MARCH OF 2014. HERE IS AN UPDATED VERSION TO MEET FEDERAL APPLICATION GUIDELINES. Click here to see the new post.
I absolutely hate having my picture taken so when I needed to apply for a new passport, the process of having to have my picture taken was very distressing. Then, I thought, maybe there are others out there that feel the same way about pictures of themselves. So, here is a little “Do and Don’t” list to help you take the best passport pictures possible.
• Do go to the official government website and read the detailed list of passport photo guidelines. http://travel.state.gov/content/passports/english/passports/photos/photos.html
• Do go to an official approved photographer to have your picture taken. While some places may advertise they “take passport photos”, they may or may not do them according to the required specifications. There is nothing worse than waiting for your passport to arrive only to get your application returned because your photo was rejected. If you’re not sure, ask them how many photographs they have taken that have been returned and rejected. Also, I wasn’t aware until recently that studio’s that take passport photos regularly go through a review process by the government to make sure they comply to the parameters and guidelines outlined for photographs. Ask if they have passed this review recently.
• Don’t try to take your own photograph unless you have the equipment necessary to make it right. The guidelines are listed on the website but they are beyond the typical photographic and equipment abilities of the average person. Most people do not have the ability to create an all-white background with no shadows and a backlight. Most home digital photo printers do not use a paper that works with the passport printing process. Do leave this to a professional.
• Do make sure you follow the guidelines for appropriate clothing. A simple, solid color long sleeve shirt in a mid-tone to dark color is best.
• Don’t wear any scarves, hats or head gear unless it is required for your religious beliefs. This includes ear phones or other electronic accessories.
• Don’t wear neck scarves or turtle neck sweaters. Your neck and chin must be exposed in the photo.
• Don’t wear strapless style shirts or tank tops.
• Don’t wear all white.
• Do make sure your makeup and hair style looks like what you wear on a day-to-day basis.
• Do leave your glasses on if you wear them every day…unless the photographer has difficulty with glass glare, then you may remove them for the photograph.
• Don’t wear dark or tinted glasses that obstruct your eyes.
• Don’t do any big cheesy grins or funny facial expressions. This is a government ID photograph not a Facebook post for your friends.
• Do have the photographer print you a couple of extra pictures if possible. You only need one for your passport application, but it’s always good to have an ID style photo available for other needs.
For me, I went to my friend Gordon Leigh from Positive Negatives in Hood River. Gordon has a great track record when it comes to passport photographs. His price is fair and he has a great turnaround time for the photos. If you’re in the Hood River area, check it out. https://www.facebook.com/PhotoRef/info . (541-386-2160 or 877-580-4543)
Now, my application is filled out and I have the dreaded photograph in my hand, it’s time to get it all turned in and then wait for it to arrive in the mail.
Can you tell which one of these pictures fits the “DO” the best? Just one more “TO DO” crossed off my list and I’m on my way to our family vacation to Europe this fall.


Leave a Reply